I love comments. If you like my work or download one of my files, please leave me a comment and let me know.

Thanks and happy crafting.

Sunday, July 19, 2009

Hello Ladies!


Hello everyone! I'm currently driving from MA to FL for a Disney vacation with the family. We have stopped for the night in Georgia. I hope all is well with you. I will update my blog when I can but it will probably be fairly quiet for the next two weeks. I'll have lots to scrap when I get back!

Photobucket

Thursday, July 16, 2009

Challenge #7


I made these autograph books for our upcoming Disney trip.

Challenge #7 was to use a cartoon character on your project.

Paper - misc. from my stash
carts - mickey and friends and mickey font

I also laminated them to keep them safe during the trip.


Photobucket

Challenge #6


This challenge was to due a newspaper theme to your layout. I finished mine but I used a dt sketch so I can't post it yet. Watch for it on scrapsketch!

Photobucket

Challenge #5


The baby book is done! Happy Dance!

This challenge was to use three different fonts. I used three different parts of the Simply Sweet cart.

sketch - scrapsketch #110 & 113
paper - dcwv "spring stack"
cart - george and simply sweet


Photobucket

Challenge #4


Challenge #4 was Christmas in July. It felt so good to do something besides baby book pages!
paper - basic grey "mistletoe and pear" (this paper was a gift from my sister-in-law. Thanks Laura!)
stamp - holiday clear stamps from wm #47625


Photobucket

Challenge #3


Challenge #3 was to use the colors brown, green and yellow.
sketch - scrapsketch #111
paper - dcwv "spring and safari kids" and misc.
fonts - sp disco ball


Photobucket

Challenge #2


Challenge #2 - Try Something New (I used my new Hannah Montana cart)
sketch - scrapsketch #ssc10
paper - dcwv "spring and safari kids"
carts - george, accent essentials, Hannah Montana and New Arrival
cuttlebug folders - d'vine swirl and stylized flowers


Photobucket

New Arrival


It's almost done. I only have two more pages for my cousin's baby book left!

This page also fulfills challenge #1 from our July crop on the pieces of paper forum. Challenge #1 was the three "S's" (stitches, stickles and skittles.)

sketch: scrapsketch #114
paper: dcwv "spring and safari kids"
carts: george, graphically speaking and stretch your imagination


Photobucket

Tuesday, July 14, 2009

New Look


As you can see my blog has taken on a whole new look. Please leave me a comment and let me know what you think. I'm totally open to all criticism as long it is done in a polite manner.

Photobucket

Precious Treasure


This is another layout for my cousin's baby book. It's almost done!

sketch: scrapsketch #117
paper - dcwv "spring and safari kids"
carts - george, plantin schoolbook, graphically speaking, all mixed up


Photobucket

Monday, July 13, 2009

and the winner is...


Congrats to Chevygirl! Please email your name and mailing address to me at creationsbyk8@gmail.com so I can mail you your goodies. You have until 6pm est on Wednesday to reach me or I'll go with the runner up.

Card Class #8

This week the ladies learned how to make a popup card. Here are their beautiful creations:

By: Kate


By: Laura


By: Mellie


By: Sara


Friday, July 10, 2009

Online crop tomorrow!

We will be having our monthly online crop tomorrow over at the pieces of paper forum. Please join us if you can. We will be starting at 12 noon est. Challenges will be posted every hour for 8 hours. How many can you do? I can usually get four or five done before I'm too tired. Can you beat me? I hope you can join us.

You are welcome to do as many or as few challenges as you would like. Also, you can make layouts, cards or altered items. It's just a chance for us to get together online and have fun.

Wednesday, July 8, 2009

I am Small

sketch - scrapsketch # 105 and 102
paper - DCWV "spring stack" and "safari kids"
carts - george, new arrival and opposites attract


Watch Me Grow

sketch - scrapsketch challenge #9
paper - DCWV "spring stack" and "safari kids"
carts - george, graphically speaking, new arrival, zooballoo, wild card and storybook


Tuesday, July 7, 2009

Card Class #7

In this class the ladies learned to make double pocket cards. You fold a single piece of paper to make this card. Didn't they do a great job?

By: Jenny


By: Sara


By: Steph


By: Laura


By: Kate


By: Christina


By: Mellie


Monday, July 6, 2009

Scal Tutorial Part #5 Part 2

Combine Sections Together

This is where we left off after the last tutorial.


If you look near the bottom, you will notice several pieces that are separated that maybe shouldn't be. This is really all a matter of opinion. If you like it this way cut it out. It will look gorgeous. I'm a little OCD (no laughing!) and feel the need to fix these.

Step1: While in the node format, I have dragged the lines to overlap the piece next to it where I would like them to be connected.


Step 2: Highlight both of these pieces. You do this by clicking on one, holding down the shift key while you click on the other.

Step 3: Click Path - union or control++


Look better? Now I'm going to do the same thing to the pieces above and to the left.


Now it's time to combine the sections together that I want cut out of the same color. Do you remember how to do that? Let's refresh:

While holding down on the sift key, click on all of the pieces you want cut out of the same color. After they are all highlighted, press control k. Now you can move them as one unit. Do this to all of your pieces and save! You are now ready to import into scal and cut away. Have fun.

Please feel free to ask any questions that you may have and please show me what you have made!

Scal Tutorial Part #5


Editing/Cleaning up Inkscape Files Part 1

Using Node Deletion and Line Dragging

Have you traced an image in inkscape but now it doesn't look right? It just needs a little editing.

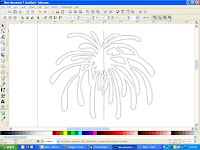
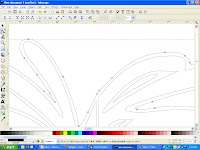
Here is a file that I have imported into inkscape, traced and changed the view to outline.


As you can see the file has some extra lines that need cleaning up.

Step 1: Click on your image so you have the black box around it and click control+shift+k.
This should break apart your image so each piece has its own black box around it.

Step 2: Click on the extra line on the left and press delete. It should disappear.


Step 3: Zoom in on the extra line at the top and press the button on the left underneath the arrow button. This is the node button.


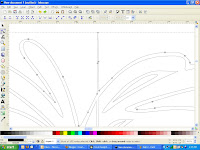
You can click on the top three nodes and delete them. I do this by using my arrow and drawing a box around the three nodes so that it highlights them all at the same time.


While they are highlighted, press delete. They should disappear and the line should be fixed.


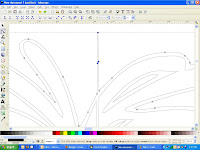
Step 4: Do this for the extra line at the bottom and the big one in the middle as well. If you find that you have accidentally deleted a node that you need, go to edit - undo and try again.

Step 5: Just below the center of the firework, you will see two spiky areas.


The top spike is easy to fix. Simply highlight the extra nodes and delete them. The bottom spike is trickier. When you delete the extra nodes, it changes the shape in a bad way.


In this case, you also need to delete the extra node on the right hand side.


Now we need to fix the shape. Grab the node on the top and drag it to the right.


You can fix the right side of the line by clicking on it and dragging it to the left until it's where you want it.


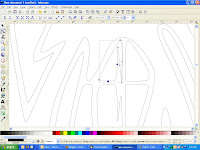
After looking at the whole thing, I have decided that I don't like the way that section looks. That's ok. We can fix it. I think that I'm going to delete the three small sections and move the right line over. Don't worry, I'll show you. lol

I'm going to delete these three sections.


After I deleted these sections, I used the delete mode/drag lines method until I got the look that I liked. Remember, this is not an exact science and yours can look great but nothing like mine!


When I backed up the image, I found that I liked this one much better. You can now, combine sections to cut out of the same color and finish your file.